Form-and-pour concrete repair is a practical way to rebuild deep vertical, overhead, and full-depth sections when hand-applied mortar would require too many lifts and shotcrete is not the best fit. The prepared cavity is enclosed with formwork, then a flowable cementitious repair material is placed by gravity. The method can restore substantial geometry around reinforcement, but only if the repair team controls access, form pressure, leakage, placement sequence, consolidation, and curing.
The critical principle is that formwork hides the repair while its most important defects are developing. A sealed face can conceal trapped air, incomplete filling, segregation, or poor contact at the top edge. This guide gives owners, engineers, inspectors, and contractors a decision and QA/QC framework for specifying and accepting form-and-pour concrete repairs.
What form-and-pour repair means
ICRI defines form-and-pour as placing repair material by gravity into an enclosed space whose exposed boundaries are defined by formwork. ACI RAP-4 describes a sequence of preparation, form construction, placement, consolidation, curing, and form removal. Buckets, chutes, buggies, or other controlled delivery methods may feed the cavity; pumping the material under mechanical pressure is a related but different method.
Form-and-pour is commonly considered for columns, walls, beam sides and soffits, pier elements, deep spalls, and repairs extending behind reinforcement. It is not automatically the right choice for every vertical patch. Shallow localized work may suit hand application, while large areas, difficult access, or complex overhead geometry may favor shotcrete or form-and-pump placement. The engineer should select the method after the cause, structural role, access, repair volume, and required material properties are understood.
Decide whether the method fits the repair
A form-and-pour repair needs a cavity that can be enclosed, filled from a high point, and vented so displaced air can escape. The material must flow through the available clearances without segregation while remaining compatible with the existing concrete and exposure. Before selecting it, evaluate:
- Structural condition: determine load paths, temporary stability, removal sequence, and whether shoring or unloading is required.
- Geometry: confirm minimum thickness, depth behind bars, narrow throats, top-edge access, and the ability to create a placement head.
- Reinforcement: check congestion, cleanliness, remaining section, laps, couplers, cover, and clear spacing.
- Material behavior: specify aggregate size, flow, working time, shrinkage control, strength development, modulus, thermal behavior, and exposure resistance.
- Construction constraints: consider batch size, lift height, form pressure, leakage control, weather, access, vibration, and curing.
Do not choose a highly flowable product only because it is easy to place. ACI’s current Concrete Repair Guide frames material and method selection within condition assessment, design, construction documents, execution, and maintenance. Our guide to concrete repair material selection explains the compatibility questions that should be resolved before procurement.
Prepare a cavity that can actually be filled
Remove concrete to sound, intentional boundaries
Removal limits should follow the approved repair design and field findings, not merely the original painted outline. Eliminate unsound concrete, avoid feather edges, and provide geometry that permits repair material to surround reinforcement and contact the substrate. Unexpected bars, extensive corrosion, unstable concrete, or deterioration beyond the approved limit require an engineering stop point.
After removal, clean and inspect exposed steel before it is concealed. Section loss is a design issue rather than a cleaning issue; see exposed rebar assessment and QA/QC. Confirm that supplemental steel, anchors, couplers, coatings, and corrosion-control components are installed to approved details.
Create a clean, bondable substrate
Remove laitance, fractured material, dust, oil, curing residue, and other bond inhibitors. Surface texture must match the repair specification and material system rather than an arbitrary roughness assumption. Verify preparation visually and, when specified, with bond testing or accepted reference surfaces. The existing article on concrete surface profile explains how to define this requirement.
Bring the substrate to the moisture condition required by the selected material. For many cementitious systems this means saturated surface-dry: pores are conditioned, but standing water is removed. Product instructions and project documents govern. A bonding agent should be used only when specified and must remain within its permitted open condition when material is placed.
Design formwork as part of the repair system
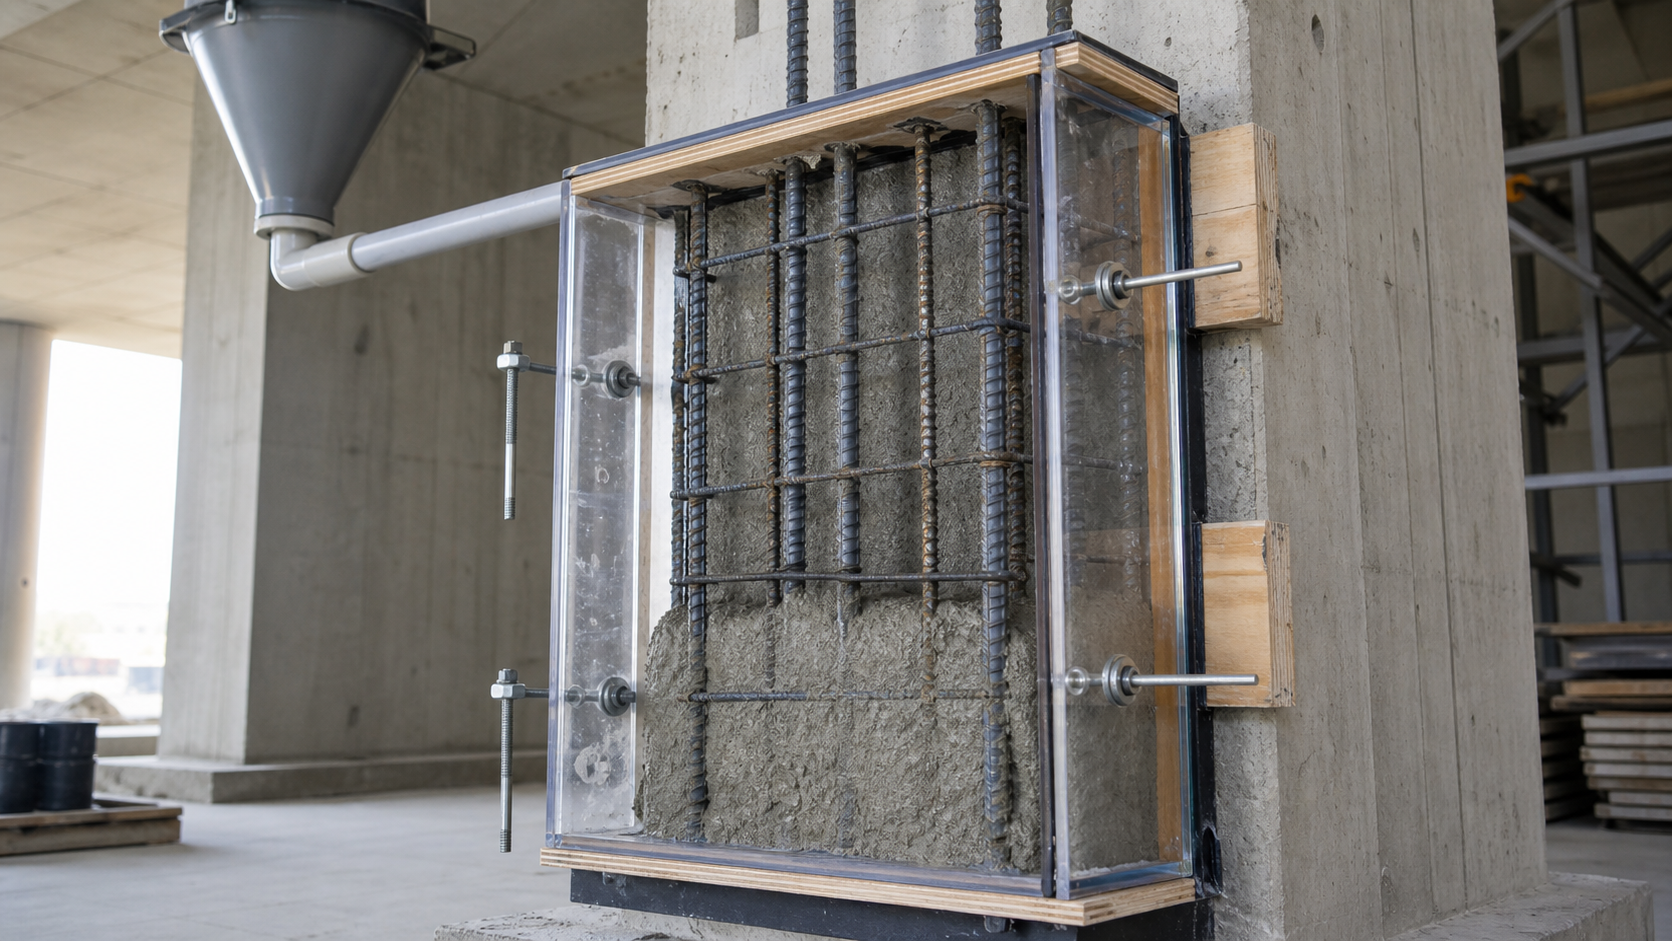
Repair forms must resist fresh-material pressure and construction loads without unacceptable movement. A flowable material can create significant lateral pressure, particularly when placement is rapid or tall. The contractor’s formwork plan should address ties, walers, supports, substrate anchorage, release agent, joints, corners, stripping, and protection of adjacent finishes. The engineer should review items that affect the structural substrate or repair geometry.
- Seal joints and penetrations so paste and water do not escape.
- Provide a placement opening or head box above the highest repair elevation.
- Provide vents at high points and locations where air could become trapped.
- Arrange cleanout access before final closure; never entomb debris in the cavity.
- Use a compatible release agent sparingly and keep it off the prepared concrete and reinforcement.
- Build enough rigidity to maintain cover and finished alignment during placement and consolidation.
A trial assembly or mockup is valuable when the geometry, material, or crew is unfamiliar. It can demonstrate sealing, flow path, venting, finish, consolidation, form removal, and repair of the placement head. Use the existing guidance on concrete repair mockups and trial panels to define meaningful acceptance criteria.
Control batching, placement, and consolidation
Prepackaged cementitious products require disciplined batching. Verify lot numbers, shelf life, storage, mixer type, water measurement, mixing time, batch temperature, yield, and working time. Do not add water later to recover lost flow unless the manufacturer and specification expressly permit it. Record rejected batches and avoid combining material at incompatible stages of stiffening.
Place continuously enough to maintain a live front and minimize lift lines. Feed from a planned location so material advances through the cavity and pushes air toward vents; random filling from multiple points can trap air. Maintain the placement head required by the procedure. Do not let material free-fall in a way that causes segregation or displaces reinforcement.
Consolidation must suit the material and cavity. ACI RAP-4 notes that conventional castable materials may need vibration or rodding, while sufficiently self-consolidating materials may not. Excess vibration can segregate a flowable mix, leak paste through joints, or overload forms. Inadequate consolidation can leave honeycombing and voids, especially behind bars and at the substrate interface. The approved method should establish vibrator size, insertion access, duration, spacing, and observable acceptance signals.
Use hold points that prevent concealed defects
The final pre-placement release should be documented before the face form closes or filling begins. Coordinate it with the broader concrete repair hold point. At minimum, verify:
- sound repair limits, accepted substrate profile, cleanliness, and moisture condition;
- reinforcement condition, repairs, cover, clearance, and secure support;
- form dimensions, rigidity, seals, vents, cleanouts, head box, and release-agent control;
- approved materials, batch controls, equipment, access, weather limits, and contingency plan;
- placement sequence, rate, lift plan, consolidation method, sampling, and responsible inspectors;
- curing materials, protection, stripping criteria, and post-stripping repair procedure.
During placement, record batch times, quantities, water, temperatures, interruptions, leakage, vent discharge, form movement, and tests required by the specification. Stop if forms bulge, ties move, uncontrolled leakage develops, the material loses workability, or filling cannot be demonstrated. Adding pressure or striking forms harder is not a safe substitute for an approved contingency.
Curing, stripping, and acceptance
Forms can help retain moisture, but exposed edges and the placement head still need the specified curing and environmental protection. Temperature, wind, substrate absorption, and early form removal can cause rapid moisture loss or thermal stress. Follow the project requirements and product data, using the controls described in concrete repair curing and protection.
Remove forms only after the repair has achieved the required strength or time criterion. Strip carefully to avoid damaging corners and the bond line. Inspect the entire exposed face and perimeter for honeycombing, voids, cracks, leakage paths, lift lines, poor consolidation, misalignment, and debonding. Sounding, pull-off testing, cores, or other examination may be specified where visual evidence cannot confirm contact or integrity.
Do not cosmetically smear over defects before they are mapped and dispositioned. Determine the cause and extent, then obtain an approved repair method. Finish the placement head and top edge without creating a weak feathered lip or water trap. Record test results, photographs, material lots, nonconformances, repairs, and final acceptance for the owner’s maintenance file.
Common failure modes to prevent
- No top vent: trapped air leaves an unfilled zone at the highest edge.
- Weak or leaking forms: movement changes cover and geometry while paste loss alters the repair material.
- Too little clearance: aggregate bridges at bars or narrow throats.
- Uncontrolled retempering: added water changes the qualified material properties.
- Improvised vibration: too much causes segregation; too little leaves voids.
- Interrupted placement: an unplanned cold joint forms inside concealed work.
- Premature stripping or poor curing: edges crack, surfaces dry, or young repair material is damaged.
- Cosmetic defect hiding: surface filling conceals the evidence before engineering evaluation.
Limitations
This article is general guidance, not a formwork design, mix specification, or structural repair detail. Prestressed members, seismic elements, deep beams, marine structures, fire-damaged concrete, chemically aggressive exposure, heavily congested reinforcement, and repairs affecting temporary stability need specialist engineering. Applicable codes, contract documents, approved submittals, safety rules, and manufacturer instructions govern the work.
Frequently asked questions
How is form-and-pour different from form-and-pump?
Form-and-pour relies on gravity to place material into the enclosed cavity. Form-and-pump uses mechanical pumping pressure. Pumping may help reach difficult locations, but it changes equipment, pressure, venting, formwork, and operational controls.
Does self-consolidating repair material eliminate all vibration?
Not by assumption. Some highly flowable materials are designed to fill without conventional vibration, while others require controlled consolidation. Follow the approved material data, mockup results, cavity geometry, and project procedure.
Why is a head box used?
A head box provides access and a material head above the repair’s top edge, helping the cavity remain full. Its dimensions and removal procedure should be planned so the final top edge is sound and properly finished.
Can the forms themselves provide all curing?
Forms can reduce moisture loss on covered faces, but exposed surfaces, edges, temperature, stripping time, and the product’s curing requirements still need active control.
How can hidden voids be checked?
Start with a filling and venting plan, placement observations, and inspection after stripping. Depending on risk and specification, sounding, bond tests, cores, or suitable nondestructive methods may supplement visual inspection. Testing should be selected for the geometry and the decision it must support.
Plan the cavity before closing the form
Structural Rehab helps owners convert assessment findings into buildable repair details, submittal requirements, hold points, and acceptance records. If a deep vertical or overhead repair needs a defensible placement plan, book a structural rehabilitation consultation. Educational resources and ebook options are also available through the site for broader repair planning.
Authoritative references
- ACI RAP-4, Surface Repair Using Form-and-Pour Techniques
- ACI PRC-546-23, Concrete Repair—Guide
- U.S. Bureau of Reclamation, Guide to Concrete Repair
- FHWA, Partial-Depth Concrete Repair Construction
- ICRI Concrete Repair Terminology
Need a professional structural assessment?
Book a consultation with Structural Rehab to evaluate repair priorities, corrosion risks, and rehabilitation options before damage escalates.
Book Consultation