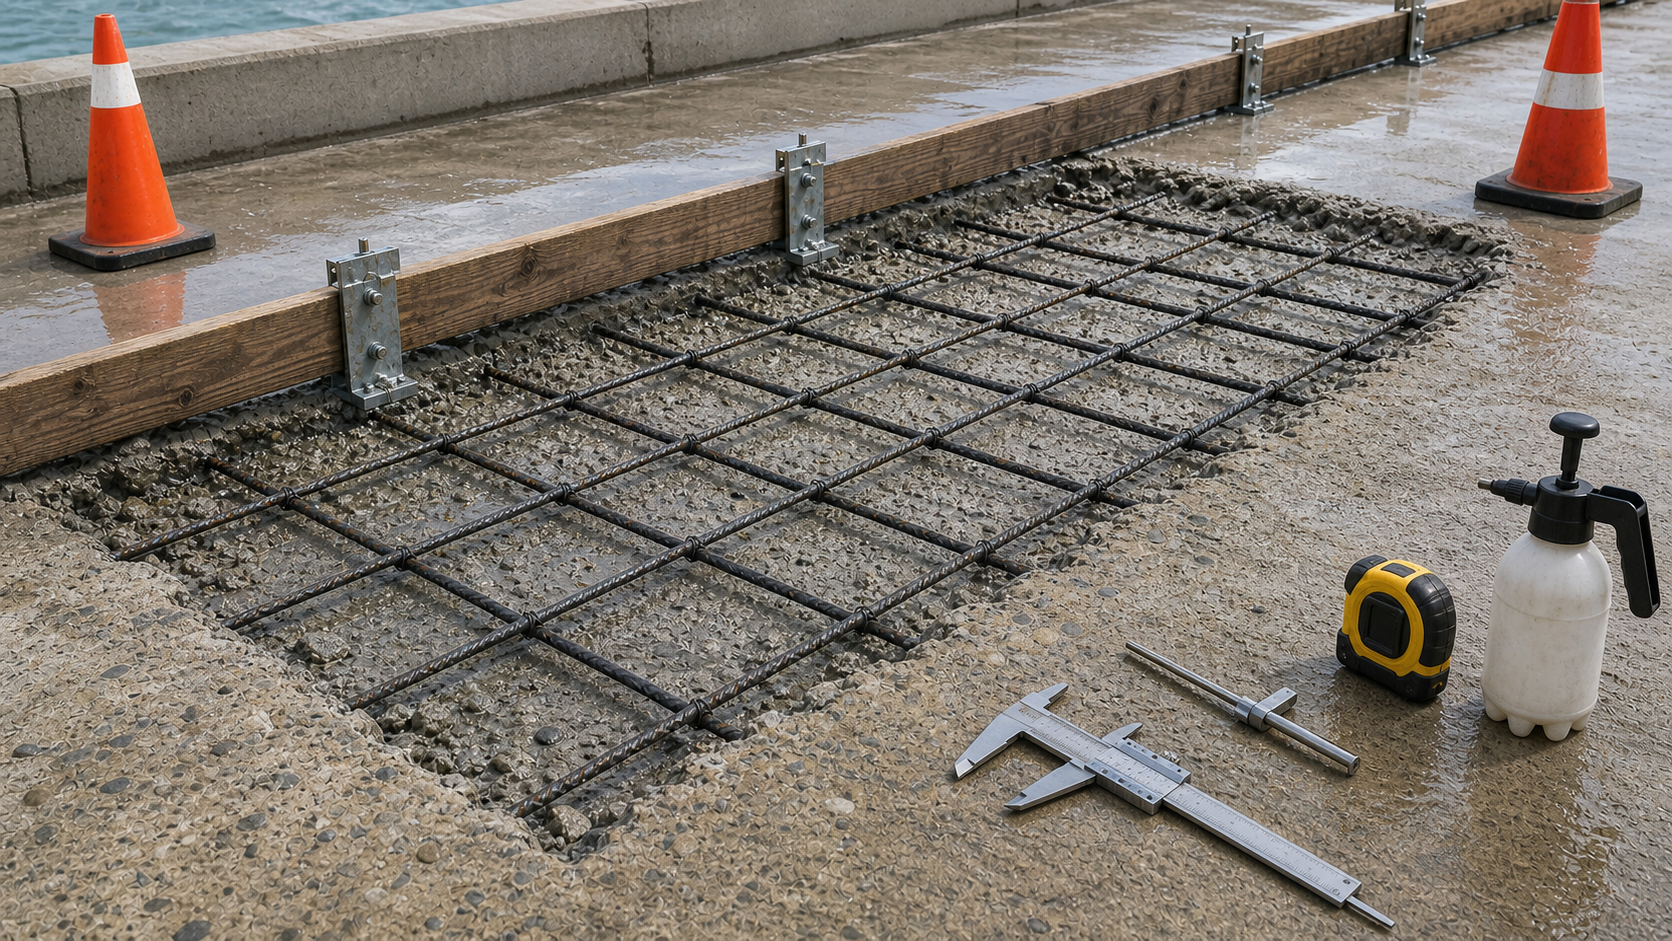
The best time to reject a concrete repair patch is before the repair material is mixed. Once mortar, concrete, shotcrete, or overlay material is placed, poor substrate preparation becomes expensive to diagnose and difficult to correct. A pre-placement inspection for concrete repairs is the hold point that confirms the repair area is actually ready for durable work.
This article is for owners, engineers, resident inspectors, and repair contractors who need a practical checklist before material goes into a prepared concrete repair area. It does not replace project specifications or engineer-of-record judgment, but it does show the issues that should be resolved before the crew starts placement.
Why Pre-Placement Inspection Matters
Concrete repair failures often look like material failures, but many begin earlier: unsound concrete left in place, contaminated surfaces, feather edges, dry substrate, unprotected reinforcement, congested forms, expired material, poor temperature control, or missed joints. A repair material can meet its data sheet and still fail if the prepared substrate is not ready to receive it.
The International Concrete Repair Institute gives pre-placement inspection a dedicated place in its Concrete Surface Repair Technician program, which covers quality control before and after repair material placement. ICRI also lists a concrete surface repair pre-placement inspection checklist among its public technical publications. That framing is useful: the hold point is not paperwork for its own sake; it is a final technical decision that the repair area, materials, and conditions match the design intent.
ACI 562 also treats concrete repair as a code-governed process that extends from evaluation and design through construction and quality assurance. For an owner, that means the inspection record should connect the original distress, the specified repair method, the substrate condition, and the acceptance checks instead of simply saying “patch complete.”
1. Confirm the Repair Limits Are Still Correct
The marked repair boundary is only a starting point. After removal, the inspector should confirm that the crew reached sound concrete and that new delamination, cracking, honeycombing, chloride-contaminated concrete, or corrosion damage was not exposed beyond the original limits. If the repair has grown, the engineer may need to revise quantities, bar treatment, edge geometry, or the repair category before placement proceeds.
For bridge decks, slabs, balconies, parking structures, and marine concrete, this check should tie back to the investigation work. Internal resources such as concrete delamination mapping, core testing and petrography, and hydrodemolition QA/QC help define whether the prepared opening is consistent with the deterioration mechanism.
Do not place over questionable concrete
Sounding, chain drag, hammer checks, visual inspection, and selective nondestructive evaluation can all be useful, but the key decision is simple: if the repair material will bond to a weak or separated layer, the patch has already lost its foundation. Mark unresolved areas, document them, and get direction before closing the hold point.
2. Verify Surface Profile and Cleanliness
The prepared surface must provide the profile, roughness, and cleanliness required by the repair system. ICRI Guideline 310.2R is widely used for selecting and specifying concrete surface preparation for repair, coatings, sealers, and overlays, including concrete surface profile benchmarks. The correct profile depends on the repair material, depth, orientation, loading, moisture exposure, and bonding requirement.
A pre-placement inspection should check that the surface is free of laitance, bruised concrete, dust, slurry, oil, curing compound, loose aggregate, carbonation residue, unsound patch material, and debris trapped behind reinforcement. If abrasive blasting, water blasting, scarifying, or mechanical removal created a rough surface, the inspector should still verify that residue has been removed. FHWA partial-depth repair guidance also emphasizes cleaning exposed faces before placement or bonding operations.
For a deeper look at roughness selection, see Structural Rehab’s guide to concrete surface profile before repair. The hold point should record the specified profile, the observed profile, and any cleaning method used immediately before placement.
3. Inspect Exposed Reinforcement and Embedded Steel
Exposed reinforcement should be checked for section loss, active corrosion, bar continuity, lap condition, remaining cover, and concrete shadowing behind bars. Rust staining alone is not enough to define severity. Where section loss is significant, the engineer may need to calculate remaining capacity, add supplemental bars, change the repair detail, or specify corrosion mitigation. Where bar congestion blocks consolidation, the crew may need a different placement method or repair material.
Before placement, confirm that reinforcement cleaning has met the specified condition and that protective coatings, passivating treatments, galvanic anodes, or other corrosion-control details are installed only where specified. If post-installed bars, dowels, or anchors are part of the repair, check hole cleaning, embedment, spacing, edge distances, adhesive lot information, and cure requirements before the area disappears under repair material.
4. Check Edges, Geometry, Forms, and Movement Joints
Repair geometry affects durability. Feather edges are usually a warning sign unless the product is specifically designed for that condition. Edges should meet the specified depth and orientation, and corners should not create stress concentrations that invite early cracking. For slabs and decks, the inspector should confirm that existing working joints, cracks, drains, bearing areas, and embedded items are treated according to the drawings instead of being accidentally locked by the patch.
Forms should be tight enough to prevent leakage but arranged so the crew can place and consolidate the material without voids. Check vents, access openings, release agent compatibility, bracing, substrate clearance, and the route for material flow. A vertical or overhead form repair needs extra attention because a small leak, trapped air pocket, or blocked placement port can create hidden voids that are hard to detect later.
5. Confirm Moisture Condition Before Placement
Moisture condition is one of the most common field misunderstandings in concrete repair. Many cementitious repair products require a saturated surface-dry condition: the existing concrete is damp internally, but there is no standing water or glossy film at the bond surface. A dry substrate can pull water out of the repair material and weaken the interface. Standing water can dilute the bond line, change the water-cement ratio at the surface, or interfere with primers and polymer-modified materials.
The required condition depends on the product and the specification. Some systems need SSD concrete, some need dry concrete, some need a bonding slurry scrubbed into the surface, and some need a primer within a defined tack window. The inspection record should state what condition was required and what was observed at the time of placement, not hours earlier.
6. Match the Repair Material to the Actual Field Condition
Material selection is not complete until the field condition is known. ASTM C928 covers packaged, dry, rapid-hardening cementitious materials for concrete repairs, but a compliant rapid repair material still has limits for lift thickness, aggregate extension, working time, temperature, curing, opening strength, and compatibility with the substrate. The project team should verify that the selected material fits the final repair depth, orientation, exposure, traffic opening, and structural demand.
Before placement, check product name, batch numbers, shelf life, storage condition, unopened bags or containers, water source, mixing equipment, measuring containers, aggregate extension, admixture permissions, and required test specimens. This is also the right moment to compare the work plan with Structural Rehab’s guide to concrete repair material selection.
7. Verify Weather, Temperature, and Curing Readiness
Pre-placement inspection should include air temperature, substrate temperature, material temperature, wind, sun exposure, rain risk, and protection measures. FHWA curing guidance defines curing as deliberate control of moisture and temperature so concrete properties can develop and early-age damage can be avoided. That matters for repair patches because many have high exposed surface area relative to volume and can dry quickly.
Curing should be ready before placement starts. Confirm wet curing materials, curing compound, insulating blankets, evaporation control, sunshades, windbreaks, rain protection, heaters, thermometers, and traffic protection as applicable. If the crew will decide curing after finishing, the hold point is incomplete.
8. Define Acceptance Tests Before the Patch Is Hidden
Acceptance testing should be tied to the repair risk. For bond-critical repairs, ASTM C1583/C1583M describes direct tension pull-off testing that can indicate near-surface tensile strength before repair or bond strength after repair. Pull-off results need careful interpretation because failure mode matters: substrate failure, adhesive failure, interface failure, or repair material failure do not all mean the same thing.
Other checks may include slump or flow, temperature, air content, density, compressive strength specimens, thickness checks, cover checks, chloride confirmation, electrical continuity for protection systems, and visual post-placement inspection. For more on bond testing, see pull-off adhesion testing before concrete repair.
A Practical Pre-Placement Checklist
- Repair boundaries match the engineer’s intent and all unsound concrete has been removed.
- Substrate profile, cleanliness, and removal of bruised concrete are acceptable.
- Exposed reinforcement has been inspected, cleaned, repaired, supplemented, or protected as specified.
- Edges, depth, corners, joints, forms, vents, and access openings are ready for placement.
- Moisture condition matches the repair material requirements at the time of placement.
- Material identity, shelf life, storage, mixing water, equipment, and batch documentation are acceptable.
- Weather, temperature, evaporation risk, curing method, and protection plan are ready.
- Inspection photos, measurements, and hold-point sign-off are recorded before placement begins.
Common Stop-Work Triggers
A pre-placement inspection should stop the repair when the substrate is still dusty or saturated with standing water, reinforcement section loss has not been evaluated, forms prevent consolidation, repair depth exceeds the material limit, ambient conditions exceed the product window, curing materials are not available, or the repair area no longer matches the design assumptions. These are not minor housekeeping items. They directly affect bond, durability, cracking risk, corrosion recurrence, and service life.
The right response is not always rejection. Sometimes the repair can proceed after vacuum cleaning, additional surface preparation, moisture conditioning, form adjustment, product confirmation, or engineer approval. The important discipline is to make that decision before placement, while the condition is visible.
FAQ
Who should perform pre-placement inspection for concrete repairs?
The role should be defined in the project documents. Depending on the repair risk, it may involve the engineer, owner’s representative, independent inspector, contractor quality-control lead, or a trained concrete repair technician. For structural repairs, the inspector should understand the repair design, not only general concrete placement.
Is pre-placement inspection only needed for large repairs?
No. Small patches can fail quickly when surface preparation, moisture condition, curing, or edge geometry is wrong. The checklist can be scaled to the repair size, but the hold point remains valuable whenever bond and durability matter.
Can a repair proceed if the surface is damp?
It depends on the repair material. Many cementitious materials require saturated surface-dry concrete, while some primers and resin systems require different conditions. The product data sheet and project specification should control the decision.
What records should be kept?
Keep dated photos, repair location, substrate condition, dimensions, reinforcement condition, surface preparation method, moisture condition, temperature, material batch information, inspector sign-off, and any engineer instructions. The record should make the hidden repair condition understandable later.
Sources
- ICRI Concrete Surface Repair Technician Program
- ICRI publications free to the public
- ICRI Guideline 310.2R for concrete surface preparation
- ACI 562 Repair Code Portal
- FHWA partial-depth repair construction guidance
- FHWA partial-depth repair guide specification appendix
- FHWA Guide for Curing of Portland Cement Concrete Pavements
- ASTM C1583/C1583M pull-off test method
- ASTM C928/C928M repair material specification
Need a repair hold-point checklist reviewed for a bridge, slab, parking structure, balcony, industrial facility, or marine concrete repair? Book a Structural Rehab consultation or download the Structural Rehab concrete and steel repair ebook from the site.
Need a professional structural assessment?
Book a consultation with Structural Rehab to evaluate repair priorities, corrosion risks, and rehabilitation options before damage escalates.
Book Consultation