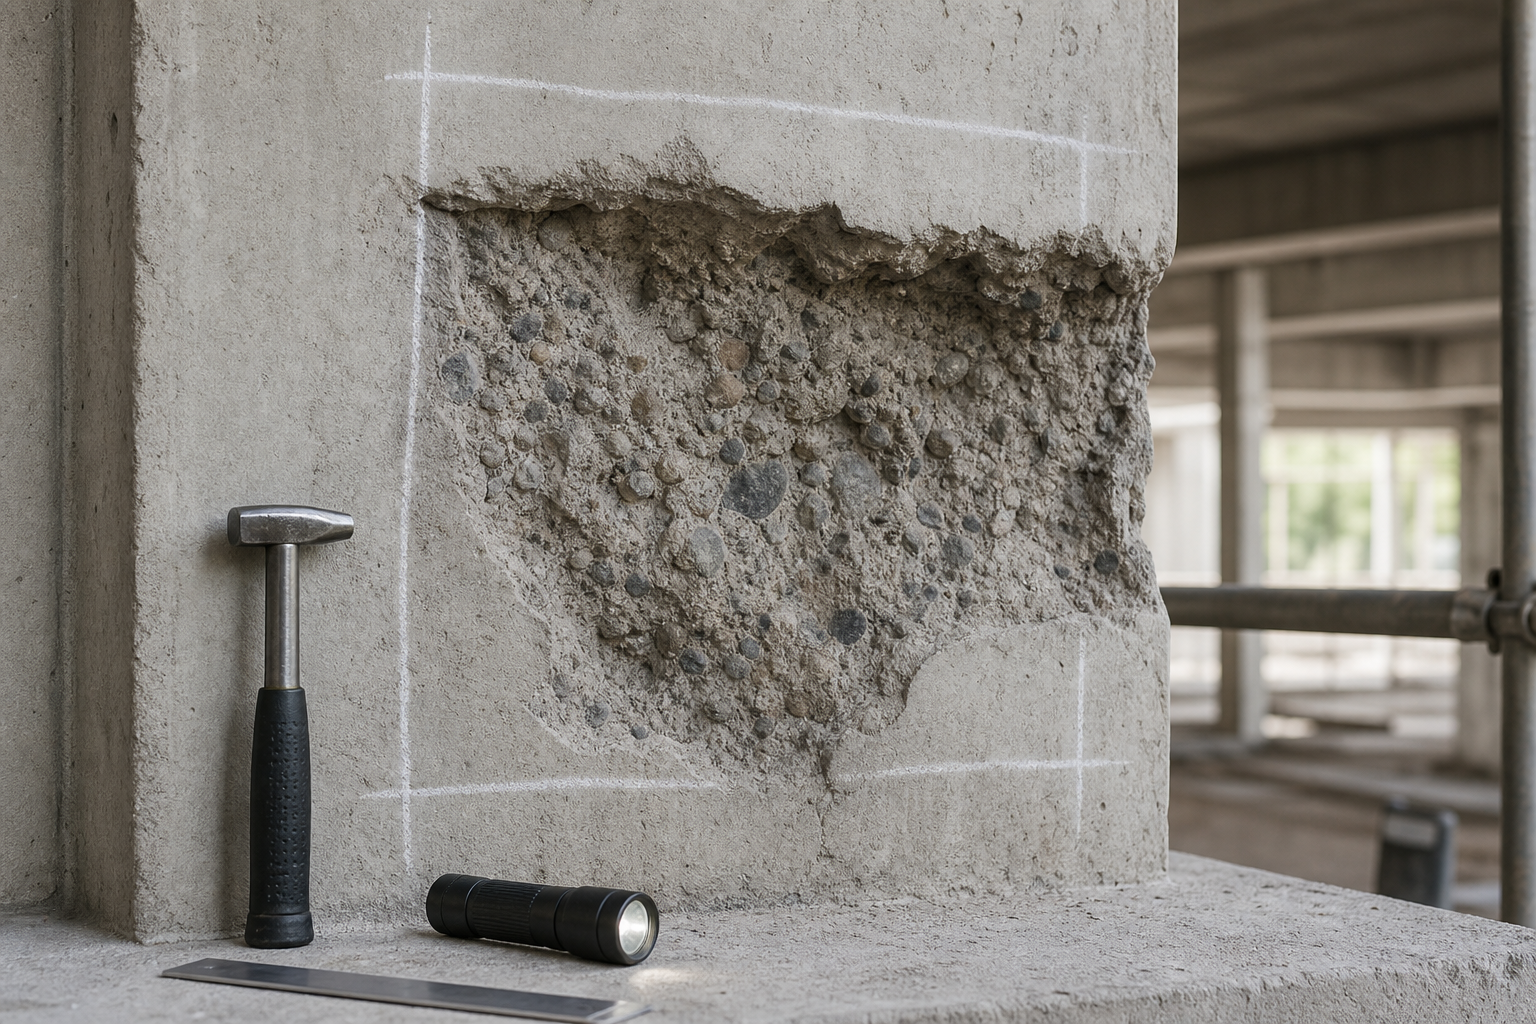
Honeycombed concrete can be a shallow appearance defect, a path for water and chlorides, or evidence that a structural region was never properly consolidated. The visible void is therefore the start of an assessment—not a complete diagnosis. Owners should resist both extremes: automatically accepting it after a cosmetic skim coat, or ordering extensive demolition before its depth and significance are understood.
A sound honeycombed concrete repair begins by defining what concrete is actually present, what load-transfer and durability functions the affected zone must perform, and whether reinforcement, embeds, joints, or prestressing hardware are involved. This guide gives owners, engineers, inspectors, and contractors a practical workflow for investigation, repair selection, execution, and QA/QC.
What honeycombing means in structural concrete
Honeycombing is an as-cast condition in which mortar did not completely fill spaces between coarse aggregate particles, reinforcement, and formwork. It is often associated with inadequate consolidation, congested reinforcement, obstructed flow, leakage of mortar through form joints, a mixture that could not pass through the available geometry, or placement practices that allowed segregation.
The U.S. Bureau of Reclamation describes honeycombs and rock pockets as voided areas caused when paste or concrete fails to fill around aggregate and reinforcing steel. That definition matters because a rough-looking surface alone does not reveal the defect depth. Bugholes confined to the form face are not the same as interconnected voids extending behind reinforcement.
Why the distinction matters
A localized shallow defect may principally affect appearance or cover. A deeper defect can reduce the effective section, interrupt bond to reinforcement, create a preferential moisture path, expose steel to contaminants, or compromise bearing and anchorage zones. Consequence depends on location as much as size. Honeycombing near a beam-column joint, corbel, tendon anchorage, splice region, base plate, or heavily sheared support deserves more scrutiny than a similar-looking patch on a lightly stressed face.
Do not infer structural adequacy from surface area alone. A licensed design professional should classify the condition when load-carrying capacity, fire resistance, bond, development, containment, watertightness, or durability could be affected.
First actions: preserve evidence and control risk
Before anyone smears mortar over the surface, photograph the defect with a scale, record its member and elevation, mark its limits, note the form and lift arrangement, and preserve placement records. Capture concrete batch tickets, slump or flow results, temperatures, test specimens, vibration records, form leakage observations, and the time at which the forms were removed. These facts help distinguish an isolated execution problem from a condition that may recur elsewhere in the placement.
If loose material could fall, reinforcement is visibly unsupported, a critical zone is affected, or the defect suggests meaningful section loss, establish an exclusion area and obtain an engineering review. Temporary support should follow a designed load path; see Structural Rehab’s guide to temporary shoring for concrete repair.
Map the defect before choosing a repair
A useful investigation progresses from non-destructive observation to selective removal and testing. The scope should be proportionate to the member’s consequence and the uncertainty.
1. Visual survey and sounding
Map visible voids, sand streaks, cracks, staining, leakage, exposed bars, and construction joints. Sounding with an appropriate hammer can help identify hollow or poorly bonded near-surface zones, but it is operator-dependent and does not quantify internal concrete quality. Record the grid, equipment, access limitations, and interpretation criteria so another inspector can reproduce the survey.
2. Reinforcement and embed mapping
Locate reinforcing steel, tendons, conduits, anchors, and inserts before drilling or removal. A cover meter can locate shallow reinforcement, while ground-penetrating radar may help in more complex layouts. Neither replaces reviewed drawings, controlled verification, or a safe drilling plan. The site’s rebar locating guide explains practical limits.
3. Selective openings and depth checks
Carefully expose representative locations under engineering direction. Determine whether voids stop at the surface, extend to the first reinforcement layer, pass behind bars, or continue through the section. Watch for loose aggregate, discontinuous mortar, poorly encased steel, contamination, and interconnected pathways. Removal should stop at sound, well-consolidated concrete rather than an arbitrary nominal depth.
4. Targeted NDT or cores where uncertainty remains
Impact-echo, ultrasonic methods, radiography, or other techniques may help identify internal anomalies, but geometry, reinforcement, moisture, access, and calibration affect interpretation. Correlate indirect results with known conditions or selective openings. Cores can provide direct information on continuity and material condition, but their locations must be engineered and repaired. Review concrete core testing before repair when sampling is justified.
Decide: accept, repair, or remove and replace
The disposition should be written and approved by the responsible design professional. A safe decision considers defect depth, member demand, reinforcement bond and development, required cover, exposure, fire rating, water tightness, appearance, access, and the reliability of the investigation.
- Accept with documentation: appropriate only when evidence shows the condition is superficial and performance requirements remain satisfied.
- Cosmetic or shallow repair: may suit limited surface defects after weak material is removed and the prepared substrate meets the selected system’s requirements.
- Localized structural repair: may use hand-applied mortar, dry-pack techniques, form-and-pour material, or shotcrete depending on orientation, depth, congestion, volume, and access.
- Partial or full replacement: may be safer where honeycombing is extensive, passes through a critical section, prevents reliable reinforcement bond, affects anchorage, or cannot be bounded confidently.
USBR guidance distinguishes minor, very early defects from delayed or extensive rock pockets that require defective concrete removal and a suitable thicker repair method. That is useful guidance, but the engineer must still adapt the repair to the actual structure and governing contract documents.
Design the repair as a system
Repair material strength alone does not make a durable repair. The system includes boundaries, substrate condition, reinforcement treatment, geometry, moisture state, placement method, curing, environmental exposure, and compatibility with the parent concrete.
Removal and edge geometry
Define removal limits and permitted tools. Avoid feather edges, bruised substrate, unintended bar damage, and microcracking from excessive impact energy. Where bars are exposed, provide enough clearance for cleaning and complete encapsulation. The engineer should determine whether cut boundaries, bar splices, supplemental reinforcement, or temporary support are required.
Substrate and reinforcement preparation
Remove dust, laitance, loose aggregate, oil, curing compound, and other bond breakers. Prepare a clean, sound, appropriately roughened substrate without damaging the member. Inspect exposed reinforcing steel for corrosion and section loss; the exposed rebar repair guide covers measurement and acceptance controls.
Material and placement method
Match the material to repair thickness, orientation, substrate moisture, thermal movement, modulus, shrinkage restraint, placement time, exposure, and curing capability. A stiff hand-applied mortar may suit a small accessible repair, while a deep or congested repair may require form-and-pour material or shotcrete. Do not improvise water additions or mix products. Use approved data, trial batches or mockups where appropriate, and the manufacturer’s current instructions. Structural Rehab’s concrete repair material selection guide provides a compatibility checklist.
For deep vertical or overhead cavities, plan vents, delivery points, head pressure, form tightness, and confirmation of complete filling. The form-and-pour concrete repair guide explains those controls.
Construction sequence and hold points
- Approve the disposition. Confirm repair limits, structural implications, support, reinforcement treatment, materials, and acceptance criteria.
- Make the area safe. Install access, containment, protection, and engineered shoring where required.
- Remove defective concrete. Work to sound boundaries using approved methods; avoid cutting unknown bars or tendons.
- Reinspect the opened cavity. Conditions often change after removal. Record actual depth, reinforcement exposure, and any extension beyond the assumed boundary.
- Prepare and clean. Achieve the specified profile and substrate moisture condition; clean and address steel as designed.
- Hold the pre-placement inspection. Verify geometry, soundness, cleanliness, bars, forms, vents, material, weather, batch plan, access, and contingency arrangements.
- Place and consolidate. Fill around reinforcement and into corners without segregation or trapped air. FHWA cautions that honeycombing reduces strength and durability and emphasizes adequate consolidation rather than dragging an internal vibrator through the mix.
- Cure and protect. Control moisture loss, temperature, vibration, impact, and premature loading for the approved period.
- Inspect and close out. Sound and visually inspect the repair, address defects under an approved procedure, and compile records.
QA/QC acceptance checklist
A repair record should connect the original defect to the final accepted work. At minimum, retain:
- defect map, photographs, dimensions, sounding or NDT records, and engineering disposition;
- removal limits, actual depths, reinforcement condition, and substrate acceptance;
- approved product, batch numbers, water or liquid dosage, mix times, temperatures, and working time;
- form, vent, placement, consolidation, finishing, and curing records;
- specified field tests, samples, bond tests, strength results, and nonconformance reports;
- final inspection, repair drawings, photographs, and responsible-party signoffs.
Acceptance should be based on project-defined evidence, not color match alone. A smooth surface can conceal an unfilled cavity; conversely, a visible texture variation does not necessarily mean structural failure. The owner, designer, inspector, and contractor should agree on measurable criteria before placement.
Common mistakes that cause repeat failure
- Skim-coating the face before determining defect depth.
- Assuming all honeycombing has the same structural significance.
- Using sounding or one NDT method as definitive proof without correlation.
- Stopping removal at a neat line while loose or porous concrete remains behind bars.
- Selecting a high-strength material without checking shrinkage, stiffness, placement, and curing.
- Leaving congested cavities without vents or a way to verify full filling.
- Omitting a post-removal engineering inspection when actual conditions differ from the plan.
- Repeating the original consolidation and access problems during the repair.
Limitations and professional responsibility
This article is general owner and field guidance, not a project-specific design, acceptance decision, or repair procedure. Hidden conditions, prestressing, critical load paths, contaminated environments, fire exposure, seismic detailing, and water-retaining service can materially change the required investigation and solution. Follow the governing code, contract documents, approved repair specifications, product data, and the direction of qualified professionals.
Frequently asked questions
Is all honeycombed concrete structurally defective?
No. Some defects are shallow and principally cosmetic, while others extend behind reinforcement or through critical zones. Classification requires evidence about depth, location, material continuity, exposure, and structural function.
Can honeycombing be repaired without removing concrete?
A superficial imperfection may need limited preparation, but filling visible surface holes does not correct loose or interconnected concrete beneath them. Remove defective material to sound boundaries when required by the approved disposition.
Which test finds the depth of honeycombing?
No single method works reliably in every member. Visual mapping and sounding may be supplemented by selective openings, impact-echo, ultrasonic methods, radiography, or cores. Access, reinforcement, geometry, moisture, and calibration influence results.
Should exposed reinforcement always be replaced?
No. It should be cleaned, measured, and evaluated. The engineer decides whether existing bars are acceptable or require supplementation, splicing, anchorage work, or replacement based on section loss, bond, development, and demand.
How can honeycombing be prevented in the repair?
Plan a repair mixture and placement method that can pass through the actual geometry. Provide tight forms, access, vents, controlled lift thickness, correct consolidation, trained workers, and a pre-placement hold point. Verify curing and do not make unauthorized water additions.
Authoritative sources
- U.S. Bureau of Reclamation — Guide to Concrete Repair
- American Concrete Institute — ACI PRC-546-23, Concrete Repair—Guide (preview)
- American Concrete Institute — ACI PRC-546.3-23, Materials Selection for Concrete Repair—Guide
- American Concrete Institute — Steps in the repair of concrete structures
- Federal Highway Administration — Full-depth concrete repair construction procedure
Plan the repair around evidence
A successful honeycomb repair restores the required function, not merely the surface appearance. Structural Rehab can help owners review defect mapping, investigation scope, repair options, hold points, and QA/QC records for concrete structures. Book a structural rehabilitation consultation to discuss a project-specific assessment and repair plan.
Need a professional structural assessment?
Book a consultation with Structural Rehab to evaluate repair priorities, corrosion risks, and rehabilitation options before damage escalates.
Book Consultation